Shaft Coupling

Coupling is a core component that transmits power and motion
from the driving shaft to the driven part while absorbing misalignment
and any possible factors that could reduce efficiency of machines
(e.g. vibration, noise, electric current, etc.)
SRGP Series Go to SRG Series(Index)
Ultra High Stiffness Rigid Coupling (Steel Body) 

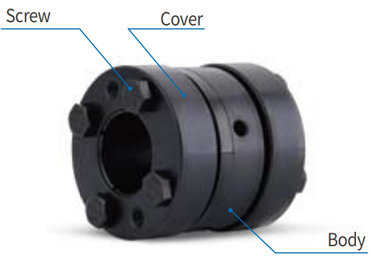
Structure & Material
| Structure | Material | Surface Treatment |
|---|---|---|
| Body | S45C (Quenching & Tempering) |
Black Oxide |
| Cover | S45C (Quenching & Tempering) |
Black Oxide |
| Screw | SCM435 | Black Oxide |
- If another surface treatment is required, please ask our customer service team.
Product Features & Application
| Backlash free (Precision) | ☆ |
|---|---|
| High Torque (Durability) | ☆ |
| Torsional Stiffness | ☆☆ |
| Vibration Absorption | – |
| Misalignment Absorption | – |
- SRG Series is one-piece metal coupling with no backlash and it doesn’t allow any loss of motion while transmitting.
- Because this series doesn’t absorb misalignment, the allocation of shafts should be set-up in line accurately without any misalignment.
- Excellent for balancing with the perfect symmetry for the rotating shafts.
- By processing inner and outer diameter simultaneously, it enables users to install the coupling in a more precise way.
Clamping Methods
| Set-screw (No mark) | General | X |
|---|---|---|
| With Keyway | X | |
| Side-clamp (C) | General | X |
| Hub Split | X | |
| With Keyway | X | |
| Taper-ring (T) | ○ | |
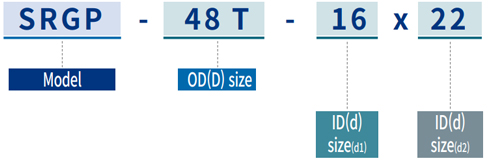
How to Order
HOW TO INSTALL
- ① Remove dust from the surface and spread oil thinly where inner bore and the inserting
shaft face each other. (Any oil type which includes molybdenum-sulfur compounds or
silicone is prohibited.) - ② Insert the shaft up to the recommended depth of the hub.
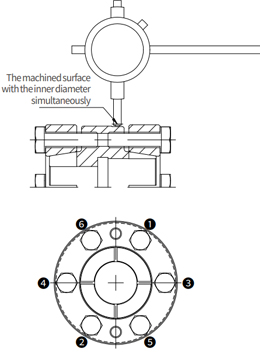
- ③ Place a dial gauge right on the surface which is machined with the inner diameter
simultaneously (see figure) and rotate the shaft. Fasten the screws with ⅛ of fastening
torque and adjust until the gauge variation(run-out) is zero. It is highly recommended to
use a torque wrench in order to fasten them with the same torque. - ④ Increase the fastening torque gradually (first ¼ and then ½ of fastening torque) in
sequential order as shown on the right-hand figure. - ⑤ Fasten the screws with full of fastening torque until the screws are firmly placed. Check
the values on the dial gauge(run-out) by rotating the shaft slowly. - ⑥Insert the opposite shaft and fasten screws according to the above instruction.